How to get root permissions
The operating systems that we use every day on our computers and portable devices are equipped with security measures that prevent us from making changes that are too “deep”, which could compromise their stability. Obtaining root permissions means logging into the system with elevated privileges, in order to bypass these restrictions and freely change even those settings that are normally inaccessible: a risky measure but which, especially in the mobile world, is essential if you want to use certain software or unlock certain functions.
Some practical examples? By rooting Android you can adjust the parameters of some hardware components, such as the processor, to increase the performance of the device or increase its battery life; by jailbreaking an iPhone or iPad you can customize iOS / iPadOS in a much deeper way than you can normally do, while authenticating as root on Windows, macOS or Linux it becomes possible to modify some system files that are usually "untouchable" .
I want to underline right away that this is a highly risky operation for the stability of the system , whatever it is, and even if in some cases it can be useful, it should only be put into practice if you know where you are putting your hands. . Are we understood? Well, then if you want to know more, keep reading: below you will find the instructions for obtaining root permissions on all the main platforms of the desktop and mobile world. Enjoy the reading!
How to get root permissions on Android
- Download the necessary programs : the drivers to allow the device to connect to the computer, the ADB and Fastboot utilities (essential to issue certain commands), the Magisk or SuperSU apps (necessary to physically obtain root permissions) and a custom recovery , such as TWRP , which is essential to transfer the root app to the device. I told you where to find everything in my program guide to have root permissions .
- Make a backup of the device : in order to install the custom recovery, through which to enable the root, it is necessary to subject the device to the unlocking of the bootloader . This last operation always involves the total deletion of the data in the memory : for this reason, I recommend that you secure your personal data, following the instructions I have given you in my guide to Android backup, or in my dedicated tutorials. specifically, to Samsung and Huawei branded devices .
- Unlock the bootloader : as I mentioned in the previous point, unlocking the bootloader is used to enable the execution of operating systems other than those provided by the manufacturer, such as custom recovery. The steps to follow to unlock the bootloader differ from device to device: on some Samsung terminals, on Google Pixel / Nexus devices and those belonging to the Android One family, it is sufficient to access the development options , enable the switch relating to OEM unlocking and give, once in fastboot mode , the command fastboot flashing unlockor instruction fastboot oem unlock; on Xiaomi devices, however, you can request the unlocking of the bootloader using a special computer program; on other smartphones, such as Motorola for example, you must instead request the unlock code directly from the manufacturer . However, to get more precise information about your device, try Google for phrases like unlock bootloader [make and model of device] . Always be aware that, following this step, all data in memory will be deleted .
- Install the custom recovery : as already mentioned above, the custom recovery is a software "external" to Android, which allows you to intervene in a profound way on the latter, performing advanced operations such as flashing (which is used to add functions to the operating system , or to replace it , with the help of a .ZIP file), wiping or repartitioning the memory. The custom recovery must be installed after unlocking the bootloader, using the fastboot utility, with the command fastboot flash boot_a recovery.img.
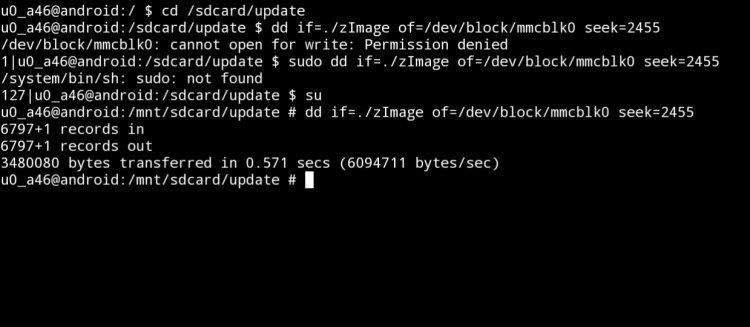
Flash the APK containing the root : once the recovery installation is complete, you need to connect the phone / tablet to the computer and enable it to be written to memory, using the Mount option of the recovery itself. Once this is done, simply transfer the .ZIP file containing the app to be used to enable root permissions (eg Magisk or SuperSU ) on the device and install it. On numerous Samsung devices, it is also possible to use ODIN, a Windows program capable of flashing apps and ROMs in ZIP format, without the need to use a recovery.
However, I believe it is right to point out that, as mentioned in the introductory jokes of this guide, enabling the use of root privileges on Android can have a negative impact on the smartphone or tablet in use: first of all, the ability to install apps and equip them with high privileges considerably increases the risk of contracting various types of viruses and malware .
Among other things, some applications - especially those for home banking, streaming and contactless payments - may stop working, for a mere security issue.
Moreover, since it is still a long series of operations (even quite cumbersome), the error is just around the corner: unfortunately, a little distraction in any of the steps is enough to compromise the functioning of the device, making it, at times, even permanently unusable.
If you still intend to unlock elevated privileges on your device and would like to have a concrete example of how to act, you would do well to read my specific tutorial on the subject , in which I have shown you everything in detail (showing you with a practical example how get root permissions on Xiaomi ).
How to get root permissions without a PC
Have you read carefully what I have explained to you so far but do you find that the procedure indicated is too complex for your skills? Would you like to know if there are apps that allow you to get root permissions without a PC , in just one tap?
Well, I don't have very good news to give you: although applications of this type are available on the Net, they are not available on accredited stores for Android (e.g. the Google Play Store, Huawei AppGallery or Amazon Appstore ), but they are published on third-party markets and not of proven integrity: for this reason, I strongly urge you to reconsider your idea of doing so and always opting for the safer route - as far as possible.
The speech is different, however, for well-known apps such as Magisk Manager , which can be used to flash the Magisk app file on Android, within a few seconds; for everything to go well, however, it is essential to have previously unlocked the bootloader of the device and installed a custom recovery : operations which, alas, still require the use of the computer.
How to get root permissions on iPhone and iPad
The procedure that allows you to obtain high access permissions to iPhone and iPad operating systems , i.e. iOS and iPadOS, is called jailbreak : after having subjected your Apple smartphone or tablet to an intervention of this type, you will be able to access parts normally “prohibited” by the operating system, such as the customization of its interface and related behaviors, after installing some tweaks.
To jailbreak iPhone and iPad, you need a computer with Windows 10 and iTunes , or a Mac , on which to install a software called AltServer ; the latter, in particular, allows you to transfer an unofficial app store for iPhone / iPad, called AltStore , to your smartphone or tablet, through which you can install the actual application capable of unlocking the elevated permissions and completing the jailbreak (the one for the most recent versions of iOS / iPadOS is called unc0ver ).
Not all, however, is roses and flowers, as the jailbreak procedure is not free from risks and consequences : first of all, unlocking the administrative privileges on the iPhone and iPad entails the immediate forfeiture of the guarantee , unless you remove it. the jailbreak before sending the device for assistance (which, if the failure prevents the device from being turned on, is practically impossible).
Secondly, following the unlocking procedure, the device could be exposed to significant security risks , which include the installation of malware and harmful software (following the jailbreak, in fact, it is possible to run non-certified and therefore potentially infected apps. ). Furthermore, for reasons strictly related to copyright, the jailbreak could inhibit the execution of some streaming apps , such as that of Sky Go .
In light of this, since iOS and iPadOS are operating systems rich in native and "authorized" features, as well as much more customizable than in the past, I do not recommend you to go down this path; however, if you are still willing to proceed, my guide on how to jailbreak the iPhone will certainly come in handy , in which I have explained everything to you in great detail (the procedure is also applicable to iPad).
Keep in mind that even in this case, the procedure to follow varies according to the version of the operating system installed on the device to be unlocked.
How to get root permissions on a computer
Do you need to get unlimited access to all parts of the operating system installed on your computer, thus bypassing any restrictions and security warnings? Then let me tell you how to get root permissions on Windows , macOS and Linux as well .
Windows
To obtain access with elevated privileges on Windows and avoid the appearance of various messages and security warnings during the execution of "delicate" actions, the Administrator account must be activated , using the appropriate function in the Microsoft operating system.
To do this, right-click on the Start button (the one with the Windows flag located at the bottom left), select Windows PowerShell (administrator) from the menu that appears and press the Yes button , in order to open a PowerShell window with elevated privileges.
Subsequently, enter the command in the window that opened net user administrator active: yesand press Enter : the appearance of the sentence Command operation successful denotes the effective activation of the Administrator account.
Personally, I also recommend that you protect the newly activated profile with a password, since this type of account offers almost unlimited access to all parts of the operating system and hides all security warnings: always in the PowerShell window, type the command net user administrator NuovaPasswordand press the Enter key on the keyboard, taking care to replace NewPassword with the access key you intend to use to open the Adminisrator account.
Note : I remind you that it is possible to run any program in Administrator mode, even without necessarily activating the profile with the highest privileges. To do this, just right-click on the icon of the program of your interest, choose Run as administrator from the proposed context menu and press the Yes button , attached to the warning message that appears later.
macOS
Even on macOS , just like on Windows, access with almost unlimited privileges is disabled for security reasons, albeit fully supported by the operating system.
However, it is possible to enable this option in a few minutes: first, go to System Preferences , by clicking on the icon depicting a gear located on the Dock , then click on the Users and groups icon and, if necessary, press on the symbol of the locked padlock located at the bottom left, to enable changes. When needed, enter your Mac admin password in the text field and press Enter .
Once this is done , click on Login Options on the left sidebar, click on the Login ... and Open Directory Utility ... buttons and, once in the new window, activate the changes, pressing again on the padlock visible at the bottom left and entering the Mac password when prompted .
Now, open the Edit menu (located on the Mac menu bar), click on Enable root user and use the next screen to define the password to be used to access the root account in the future.
To conclude, press the OK button and that's it: starting from this moment, you will be able to access the graphical interface of the root user by clicking on the Other ... item located in the macOS login screen and typing, when requested, the name root user and the previously set password .
If you had set the Mac for automatic access to your user, you can view the login screen by clicking on the Apple menu (the symbol of the bitten apple located in the upper left corner of the screen) and selecting the item Log out from [name]
Linux
Even in the case of Linux , unlocking root permissions provides almost uncontrolled access to any part of the operating system and allows you to operate on all files, even the most delicate ones: therefore, I invite you to use this mode of action only if you know perfectly what you are about to do, as a wrong command is enough to compromise, in whole or in part, the correct functioning of the distribution you are using. Then don't say I didn't warn you!
Having said this, if you need to have root access directly from the Terminal (to run a program or a series of commands, for example), you can prepend the instruction you are about to execute with the word sudo: for example, if you are interested in executing the ' gedit text editor with administrative privileges, you will have to type the command sudo gedit, give Enter and then specify the administrative password of the computer.
If you need to issue multiple instructions in sequence, run the command instead sudo -s, press the Enter key on the keyboard and, when prompted, enter the password of your user account: by doing so, all the commands given within the same window / tab of the Terminal will enjoy high privileges. When you're done, don't forget to exit the shell with root access by issuing the command exit.
Finally, if you need to start the Linux GUI with root access , you will have to perform a slightly more "cumbersome" operation: this possibility, in fact, is disabled by default.
The steps to take vary greatly, depending on the desktop environment and the display manager in use on your distribution: by way of example, below I am going to show you the steps to perform on Ubuntu 20.04 and 21.04 , operating systems equipped with the GNOME desktop and the display manager gdm
First, therefore, open the Terminal by recalling it from the Distribution Applications view and set a password for the root account of the operating system: type the command sudo passwd root, press the Enter key from the keyboard and, when prompted, enter the security key to use for root access , twice in a row, remembering to enter each time.
If everything went smoothly, following this operation, the Terminal will notify you that the password has been updated correctly . Now, issue the command sudo passwd -u root, press the Enter key on the keyboard and, if prompted, type the password of the user you are logged in with and give Enter again : starting from this moment, the root account is active on the operating system and can be set as a login account.
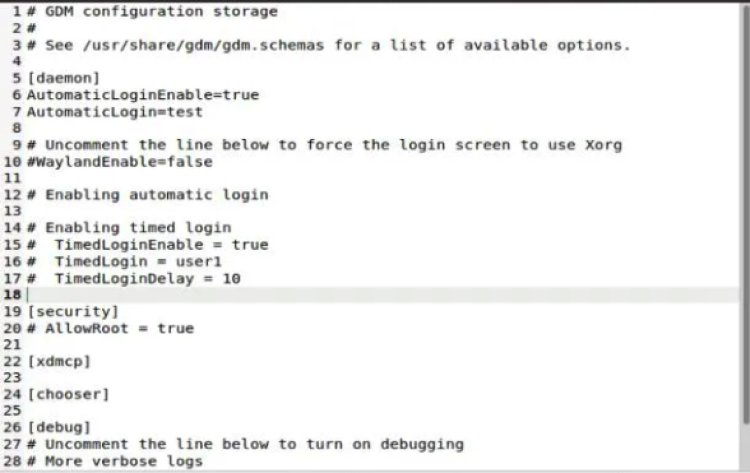
At this point, you just have to enable the root user as an access option on Ubuntu: still in the Terminal, type the command sudo gedit /etc/gdm3/custom.confand enter , in order to open the configuration file of the Ubuntu display manager in edit mode; if prompted, enter the password of the account with which you are logged in and press Enter again .
Now, find, inside the gedit window that has opened on the desk, the wording [security], go to the new line and paste the string # AllowRoot = trueon the new line; after that, click on the Save button at the top, in order to save the changes made and close gedit.
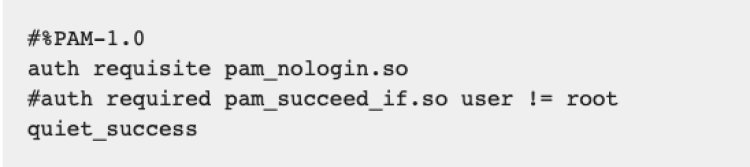
Once this is done, open the file dedicated to the security settings of gdm for editing, issuing the command in the Terminalsudo gedit /etc/pam.d/gdm-password : locate the string auth required pam_succed_if.so user != root quiet success, add the symbol #to the beginning of it and save the file , to get something like this.
We are almost there: always through the Terminal , open the file related to the settings of the root user profile for editing, by typing the command sudo gedit /root/.profile, then locate the wording mesg n || true( oppure mesg n 2> /dev/null || trueon Ubuntu 21.04) and make it become tty — s && mesg n || true(or tty -s && mesg n 2> /dev/null || trueon Ubuntu 21.04).
Finally, save the file, restart your computer and wait for the Ubuntu login screen to be shown: to log in to root, first click on the item Not listed? , then type the word root in the Username field , enter Enter and complete the login by entering the root password specified above.
Note : If you have set Ubuntu to log in automatically, you must first log out of the current user in order to access the GUI with root privileges. To do this, click on the shutdown button located at the top right and select the items Shut down / End session> End session from the menu that appears.