How to recover deleted photos on Android

Were you doing some cleaning between the photos taken with your Android smartphone and, by mistake, you also deleted some shots that you had to keep? Don't despair, there may still be a chance to get them back. If the portion of memory where your images were saved has not already been overwritten by other data, you can restore the photos even if you have removed them. Just use the right tools.
If you want to try it, below you will find explained how to recover deleted Android photos thanks to some applications that you can run directly from your mobile device or PC. In principle, those that are performed from the computer would be preferable, because in this way new data is not copied on the phone (or tablet) and therefore reduces the risk that the photos to be recovered will be overwritten by other data, but also the apps that work directly. from Android are very reliable (as well as very comfortable to use).
Let me be very clear, then: based on what I just told you, I cannot 100% assure you that, in the end, you will be able to get your shots back from this guide, but it won't hurt to try. So, just chat and let's get to work right away! Position yourself comfortably, take your device and put into practice the instructions you find below. Happy reading and good luck!
How to recover deleted Android photos without root
If you have not performed the root procedure on your device , through which it is possible to bypass the standard Android protection measures which, as a rule, do not allow users to act on certain advanced aspects of the system (e.g. adjust the CPU frequency , block the execution of apps while the device is in stand-by and, in fact, thoroughly scan the phone or tablet memory to search for the files to be recovered after deletion), you cannot properly use the features offered by data recovery apps, about which you can find more details in the next step .
What you can do, however, is to try to recover the images of your interest without resorting to more complex solutions by looking in the Trash of the app you use as a Gallery. You may not know it, but Google Photos and other Gallery apps pre-installed on Android devices have a handy bin , similar to that of computers, in which all the images and videos that are deleted from the app automatically go, and in which they remain. for 60 days before they are permanently deleted.
So, to try to recover deleted Android photos without root as I just indicated, take your device, unlock it (if necessary), access the home screen and / or the drawer and start the Google Photos app or the alternative Gallery . you use by selecting the relevant icon .
Once the main screen of the app is displayed, touch the wording Collection which is located at the bottom right and then that Trash present in the new screen. At this point, if among the items in the trash there are also the deleted photos of your interest, to recover them touch the word Select located at the top right, select the contents of your interest and tap the Restore option twice in a row. The directions I just gave you apply to Google Photos, but they are also applicable to other Gallery apps.
How to recover deleted photos on Android: app
Another system that you can adopt to recover deleted Android photos is to resort to the use of some apps designed for data recovery, so not only images, but also videos, audio, etc. As I had anticipated, however, keep in mind that such solutions are effective only if the root procedure has been carried out on the device in use .
DiskDigger photo recovery
The first app to recover deleted photos on Android that I suggest you try is DiskDigger photo recovery . It is a tool through which you can recover images in JPG and PNG format deleted from your device. It is free, but eventually it is also available in a paid version that costs 3.37 euros and allows you to restore other types of files. It allows you to intervene both on the internal memory of the device and on any external media in use. To work, as I told you, it requires root.
To download and install the app on your device, visit the relevant section of the Play Store and press the Install button (if you are using a device on which Google services are missing, you can download the app from alternative stores ). Then, start the app by selecting its icon that has been added to the home screen and / or drawer.
Now that you see the main screen of DiskDigger photo recovery, grant the requested permissions , refuse the upgrade to the Pro version, select the drive in which to search for the photos (it should be the one selected by default), put the check mark next to the JPG and / or PNG items and tap the OK button to start searching for deleted files.
At the end of the scan, put the check mark next to the thumbnails of the photos to restore, tap the Recover button at the top right and select one of the icons in the menu that opens: the cloud if you want to auto-send yourself photos via email or you want to save them on a cloud storage service, the folder if you want to save them on the memory of your device or the arrow if you want to upload them to an FTP server.
Undeleter Recover Files & Data
Undeleter Recover Files & Data is another application to recover deleted photos on Android, which acts by performing a thorough scan of the smartphone or tablet memory, in order to recover all the data that has not yet physically disappeared from the device. Again, root is required to function properly . It should be noted that basic is free, but to save any recovered data you have to switch to the full version via in-app purchases (at a price of 3.19 euros).
To use Undeleter Recover Files & Data, retrieve the app from the relevant section of the Play Store (or from alternative stores ), then start the app by selecting its icon on the home screen and / or in the drawer and, once the screen is displayed Undeleter Recover Files & Data main, grant the required permissions .
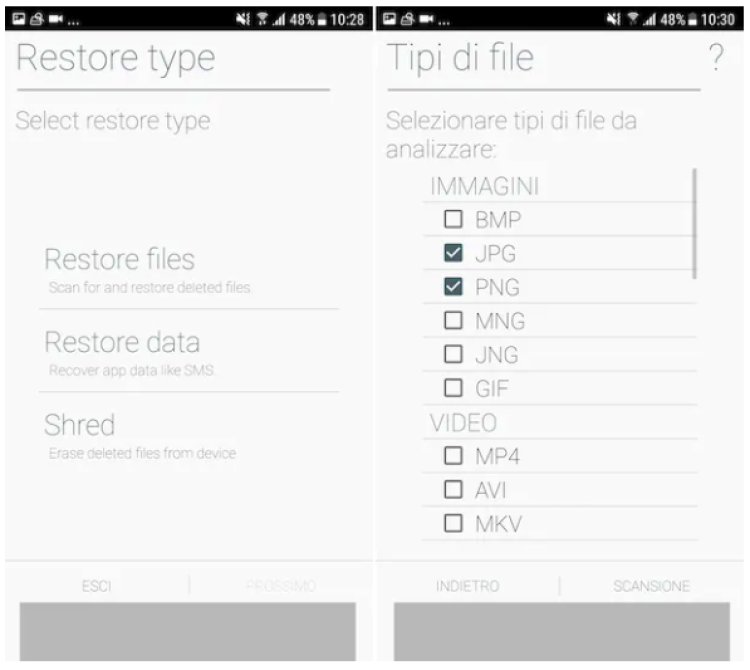
Then, choose the Restore files option , select the drive to scan, indicate whether to perform a deep or generic scan , put the check mark next to the JPG and PNG options that you find in the Images section and tap the Scan button to start search for images
At the end of the procedure, select the images of your interest that you want to recover and, if you decide to buy the full version of the app, tap on the relative previews , then on the button with the three dots vertically at the top right, touch the wording Save the file from the menu that opens and indicate the output location .
How to recover deleted Android photos from PC
Interested in understanding how to recover deleted Android photos from PC ? Then read on. In fact, below you will find those that, in my humble opinion, represent the best programs useful for the purpose. I sincerely hope they can help you.
PhotoRec (Windows / macOS / Linux)
If your Android smartphone or tablet has a microSD card on which images are stored, the most effective solution, from a computer, which you can use to recover deleted photos on Android is PhotoRec . It is a free software for Windows, macOS and Linux that restores all recoverable files from external storage drives. It should be noted, however, that only the Microsoft operating system has a user interface. It comes paired with TestDisk , another free program for recovering lost partitions and repairing software-damaged disks; however, you are only interested in PhotoRec.
To download PhotoRec on your computer, visit the program's website and click on the link for the operating system you are using that you find in the section TestDisk & PhotoRec xx (month day, year), Data Recovery .
At the end of the download, if you are using Windows , extract the ZIP archive obtained in a folder of your choice and start the qphotorec_win.exe file that is inside. In the window you see appear on the desktop, click on the Yes button and, once the main PhotoRec screen is displayed, select the microSD drive from the drop-down menu at the top.
Then, click on the entry for the primary partition of the card (it should be the one called FAT32 , FAT16 or exFAT ) and put the check mark next to the entries FAT / NTFS / HFS + / ReiferFS and Free .
At this point, click on the File formats button and, in the window that opens, put the check mark only next to the JPG or PNG items or in any case to the image formats you are interested in, so that PhotoRec tries to recover only the files of this type. To reset the default selection of all extensions, click the Reset button .
Finally, click on the OK button , select the folder in which to save the photos recovered from PhotoRec by clicking on the Browse button and start scanning the microSD by clicking on the Search button . After the scan is complete, you will find all photos recovered by PhotoRec in the folder mentioned above. It was simple, wasn't it?
If you are using macOS , on the other hand, open the tar.bz2 archive downloaded on your computer, extract the contents in a location of your choice and start the photorec file that is inside it, right-clicking on its icon and choosing the Open item from menu that appears.
The Terminal window will then open. So, use the right keyboard arrow to select the Sudo option , press the Enter key and enter your Mac admin password .
Then, select the drive relating to the microSD card of your smartphone or tablet, indicate the partition on which you want to act, select the file system with which the latter is formatted and decide whether to scan only the space marked as free or whether to thoroughly check the whole unit .
Next, specify the folder where you intend to save the contents of the memory card once the recovery procedure is complete, press the C key on the keyboard to confirm your intentions and wait for the scan to complete.
Wondershare dr.Fone
Wondershare dr.Fone is also a great software to use to recover deleted photos on Android. It is, in fact, a well-known and reliable data recovery tool, which is able to act not only on images, but also on videos, messages, contacts and various other data. It's there for both Windows and macOS and it's super easy to use. You can download and use it for free, but only to view the recoverable data from the device memory and recover some of it. To recover deleted data without any limit, you need to switch to the paid version of the program (with prices starting from 39.99 euros).
To download Wondershare dr.Fone on your computer, connect to the program's website and click on the Try for free button located in the center of the page.
When the download is complete, if you are using Windows , open the .exe file obtained, click on the Yes button in the window that is shown on the desktop and then on the OK button . Then, select the item I accept the terms of the license agreement , click on the Next button (four times in a row), wait for all the files necessary for the operation of the software to be downloaded from the Internet and press the button to start the program and conclude the setup .
If you are using macOS , on the other hand, open the downloaded .dmg package , click on the Accept button and drag the Wondershare dr.Fone icon into the Mac Applications folder , then right-click on it and select the Open item twice in a row, so to start the program going to circumvent the limitations desired by Apple towards non-certified developers (an operation that must be performed only at the first start).
Now that you see the main window of the software on the screen, connect your Android smartphone or tablet to the computer, using its charging cable, click on the data recovery button , making sure in advance that USB debugging is enabled on the device in the developer options , as I explained to you in detail in my guide on how to activate developer options .
Then, accept the installation of Connector and Dr.Fone on your smartphone or tablet, which are two apps necessary for the correct functioning of Wondershare dr.Fone , answer affirmatively to the request for communication with the PC and, if you have performed the root on your device, allow its permissions .
When the screen for choosing the data to recover appears, choose the Phone Data Recovery tab in the left sidebar. Alternatively, you can perform the recovery of the data on the microSD .
Then, check the Gallery option , click on the Next button and wait for the scanning procedure to be completed. If you have a rooted device, also check the Scan for deleted box , go ahead, grant root permissions to dr.Fone on the device and wait for the device scan to complete.
In conclusion, select the thumbnails of the photos to recover, click on the button to recover data on the device or on the button to recover data on the computer , confirm your intentions and it's done.
How to recover deleted WhatsApp photos on Android
Have you ended up on this guide of mine because you are interested in finding out how to recover deleted WhatsApp photos on Android ? Well, I inform you that if the images of your interest had been saved in the gallery of your mobile phone, you can first try to recover them by "browsing" in the basket of the Gallery and / 0 using the apps and programs that I have already suggested in the previous lines. Another useful way is to use the backups of the service. If you want to know more, check out my specific guide on how to recover deleted photos from WhatsApp on Android .